
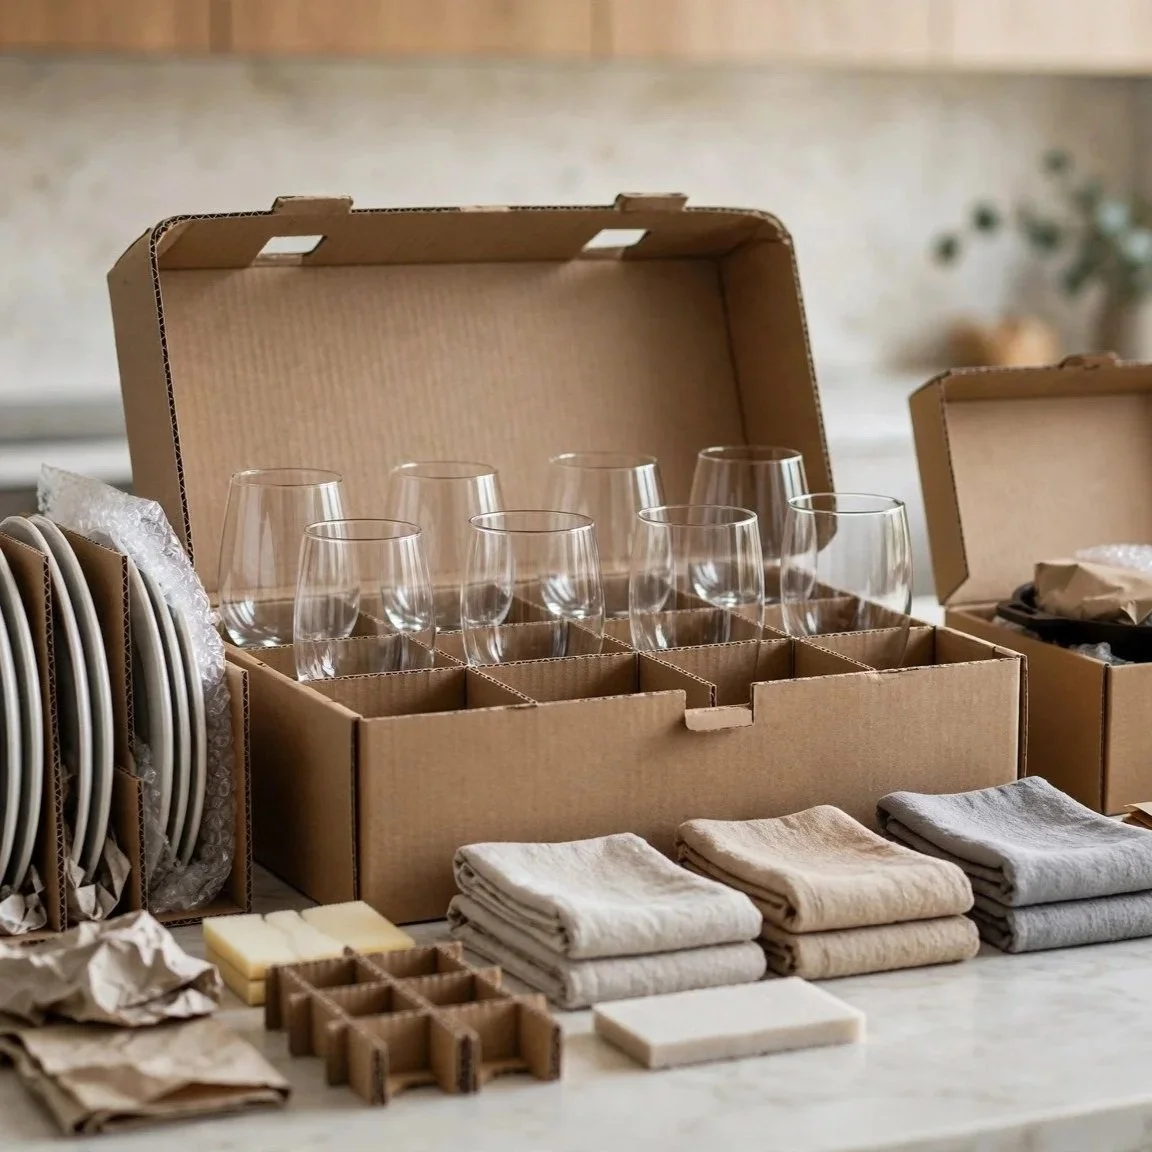
The kitchen is the room most people leave for last and regret leaving for last. It holds more individual objects than any other room in the house, and almost none of them pack the same way. You have plates that chip if they lie flat, wine glasses that snap at the stem, cast-iron skillets that could crush a cereal box, cords that tangle, blades that cut, and a pantry full of things that leak. Trying to fill a box from a random cabinet, then padding as you go, is how a move ends with a garbage bag of shards and a mystery smell.
A system fixes that. Sort the room into zones, match each zone to the right box, and pack the same way every time so nothing gets improvised at 11 p.m. This guide walks through why the kitchen fights you, then the exact way to box each category so it arrives in one piece and you can still find the coffee filter the next morning.
QUICK ANSWER: Pack a kitchen by zone using the right boxes: dish-pack cartons with cell kits for plates and glassware, small boxes for anything heavy, and a first-night box packed last. Stand plates on edge, cushion glasses in cells, nest padded pots, sheath knives, seal every liquid, and fill all voids so nothing shifts.
Why the Kitchen Is the Hardest Room to Pack
Most rooms hold one or two kinds of things. A bedroom is soft goods and a few frames. The kitchen is a warehouse in miniature: fragile, heavy, sharp, awkward, and perishable, all sharing the same cabinets.
Fragile items fail in a specific way. A plate packed flat cracks because the whole stack's weight lands on the bottom edge with every bump in the road. Stand that same plate on its edge, and the force runs along the strongest line of the piece, the way a wall stands but a shelf sags. Glass fails at its thinnest point, which is usually the rim or the stem, so those pieces need to be held so they never touch each other or the box wall.
Then there is weight. A drawer of flatware or a stack of cast iron feels manageable in the cabinet and becomes a back injury once it is a full box someone has to carry down stairs. And several kitchen items are simply hostile: chef's knives, mandoline blades, kitchen shears. Mix those loose into a box, and you have handed a mover a hidden hazard. Sort the room by these traits first, and every later decision gets easier.
Gather the Right Boxes and Materials
Buying the correct cartons is the single biggest thing that separates a clean kitchen pack from a broken one. Regular moving boxes are too big and too weak for what the kitchen contains.
The boxes that matter
Dish-pack (dish-barrel) cartons: These are double-walled and about twice as strong as a standard box. They are built for plates, bowls, and serving pieces.
Cell kits (dividers): Cardboard grids that drop into a dish-pack and give each glass or stemware piece its own compartment so pieces never knock together.
Small (book-size) boxes: Reserve these for anything heavy: canned goods, cast iron, small appliances, dense gadgets. A small box caps the weight so it stays liftable.
A couple of medium boxes: For light, bulky items like plasticware, mixing bowls, and dish towels.
The padding: Have plenty of clean packing paper, a roll of bubble cushioning for the most delicate glass, and painter's tape or self-stick foam for blades. Skip newspaper on anything you eat off; the ink transfers. Keep a marker and a roll of tape within reach so labeling happens as each box closes, not after.
Pack by Zone, Not by Cabinet
Working cabinet to cabinet mixes a heavy pot with light lids in the same carton and leaves you re-sorting. Instead, group the whole kitchen into eight zones and clear one at a time: everyday dishes, glassware and stemware, pots and pans, small appliances, knives and sharp tools, gadgets and utensils, pantry and food, and the first-night essentials. Finish a zone, label the box with the room and its contents, then move on. This is where a mental map of the room pays off: you always know what is packed and what is left.
Label every box on the top and one side with the room name and a short contents line, plus the word FRAGILE and an arrow showing which way is up on anything breakable. A box labeled only on top disappears once it is stacked.
Dishes: Stand Them on Edge
Wrap each plate individually in paper, then stack three or four wrapped plates and wrap the bundle again. Load the bundles into a dish-pack vertically, standing on their edges like records in a crate, never flat. Line the bottom of the carton with two to three inches of crushed paper first, and pack the heaviest pieces (dinner plates, platters) toward the bottom, lighter bowls above.
Bowls can nest with a sheet of paper between each one, then get wrapped as a group and stood upright too. Once a layer is in, fill every gap along the walls and corners with crushed paper so nothing can slide. Give the closed box a gentle shake; if you hear or feel movement, add more padding.
Glassware and Stemware: One Cell Each
Glasses are the pieces most likely to arrive broken, so they get their own protection. Set a cell kit inside a dish-pack and give every glass its own compartment. Roll a stuffed sheet of paper inside each glass first to support the walls from within, then wrap the outside and slide it into a cell.
Stemware needs extra care at the stem, the weakest point. Wrap the bowl and the stem separately, then together, and stand each piece in its own cell rim-down. Reserve bubble cushioning for anything thin or irreplaceable. Keep stemware and heavy glass in separate boxes, and mark these cartons FRAGILE on every face.
Pots, Pans, and Bakeware: Nest with Padding Between
Pots and pans are sturdy, but their weight and hard edges will batter anything soft nearby, so they travel together. Nest them largest to smallest with a sheet of paper or a thin foam layer between each one so the surfaces do not scratch or clang.
Wrap glass lids separately, since those are the fragile part, and stand them on edge alongside the nested stack. Cast iron and heavy stockpots belong in a small box on their own, never stacked on lighter cookware. Fill the remaining space with dish towels or crushed paper so the stack cannot shift in transit.
Small Appliances: Original Boxes or Full Cushion
If you saved the original boxes for the blender, coffee maker, toaster, or stand mixer, use them; they were engineered for that shape. If not, wrap the body in paper or bubble cushioning and set it in a small-to-medium box with padding on all sides.
Secure loose parts and cords so nothing whips around: coil each cord, band it, and tuck it against the body rather than letting it trail. Remove and separately wrap any glass carafe or detachable blade. A stand mixer is dense, so it rides alone in a small box; a lightweight toaster can share a padded medium box with other light appliances.
Knives and Sharp Tools: Guard and Label
Sharp tools are the clearest injury risk in the whole kitchen, so treat them with intent. An unsheathed chef's knife or a loose mandoline blade in a box is a laceration waiting to happen for whoever reaches in.
WARNING: An unsheathed chef's knife, a loose mandoline blade, or bare kitchen shears in a box is a laceration waiting to happen for whoever reaches in blind. Sheath every blade in a guard or a taped cardboard fold, bundle and wrap them together, and mark the carton SHARP in large letters. Tell your crew which box holds the blades so no one grabs it by the wrong edge.
Pantry, Food, and the First-Night Box
Go through the pantry before you pack it. Discard anything perishable or already open that could spoil or spill, and give away sealed items you will not use rather than paying to haul them. Canned and jarred goods are dense, so keep them in small boxes and cap the weight.
Any liquid (oils, sauces, syrups) gets extra insurance: tape the cap, then seal the bottle in a zip bag so a loosened lid cannot soak the box. Stand bottles upright and pad between them.
Pack a first-night essentials box last and load it onto the truck last so it comes off first. Include a few plates, cups, and utensils, a knife (guarded), a sponge and dish soap, paper towels, coffee gear, a can opener, and any medication or pet-feeding supplies. That single box is the difference between eating dinner the first night and digging through a stack at midnight.
Keep Every Box Liftable
A box you cannot lift safely is a box that gets dropped, and a dropped kitchen box is broken dishes plus a hurt back. The fix is boring, and it works: dense things go in small boxes, light things fill the big ones.
A useful gut check is whether you can pick the box up and hold it without straining. Cans, cast iron, small appliances, and stacked bakeware fill a small carton and stop there, even if it looks half empty. Bulky, light items like plasticware and linens go in the larger boxes. Top off every carton with crushed paper so the lid closes flat and the load cannot shift, then tape the seam and both edges. Flag your heaviest cartons and plan to team-lift them; two people sharing a load beats one person testing a limit.
Frequently Asked Questions
How far ahead can I pack the kitchen without losing use of it?
Start seven to ten days out with the zones you rarely touch: good china, serving platters, specialty bakeware, the waffle maker. Leave one mug, one plate, one bowl, one set of utensils, and a pan per person out until the last day, then those go straight into the first-night box. A common miss is packing the coffee maker and the can opener early; keep both out until moving morning.
Do I need special boxes, or can I wrap dishes in towels and clothes?
Towels, dish cloths, and t-shirts make fine padding and save on paper, so wrapping plates or filling voids with linens is smart. What they cannot replace is the box itself: a standard single-wall carton flexes and lets fragile items press together. The double wall of a dish-pack is what actually stops crushing, so use the right carton and let the soft goods handle the cushioning inside it.
How should I handle a glass stovetop or the panels of a range?
Detachable glass, like a range's glass lid, oven racks, or a glass cutting board, travels standing on edge, wrapped in bubble cushioning, ideally in a flat mirror or dish carton rather than laid flat where a stacked box can crack it. Slide a sheet of cardboard on each face for a rigid sandwich. Racks and grates get wrapped separately so their edges do not scratch the glass.
What is the safest way to move a full spice rack or open seasonings?
Loose jars rattle and open pouches leak, so corral small containers together. Set spice jars upright in a small box or a lidded plastic bin, packed snug with paper so they cannot tip. Roll open pouches down, tape them, and bag them. Wrap anything in a glass grinder like glassware. Group them so the whole set is packed and labeled in one place instead of scattered across cartons.
Should the refrigerator and freezer be emptied and defrosted before moving day?
Yes. Plan to run down or give away refrigerated and frozen food in the last few days, since it will not survive the move. If the fridge itself is going, empty it, unplug it, and let it defrost and dry for at least a day so it does not drip or grow mildew inside a sealed truck. Tape the door slightly ajar once it is dry. Coolers with ice packs can carry a small amount of must-keep food for the first day.
How do I keep box labels useful when everything says "kitchen"?
A label that only reads "kitchen" is useless when twelve boxes say the same thing. Add a second line naming the zone (glassware, pots, pantry) and a priority mark: star the first-night box, write SHARP on the knife carton, and note FRAGILE with an up arrow on anything breakable. Number the boxes and keep a quick list on your phone so you know at a glance whether all twelve arrived and which to open first.
Book a crew that packs the kitchen right — protect every plate, blade, and box from counter to truck. Aardvark Movers serves Phoenix and the Valley. Call (602) 716-5555.


